- Introduction
- Top Questions & Pain Points
- Project Outline (5–7 Main Steps)
- Step-by-Step Instructions
- Troubleshooting & Common Mistakes
- FAQs
- Next Steps & Advanced Techniques
- Glossary of Terms
- Recommended Visual Aids
- Conclusion
Introduction
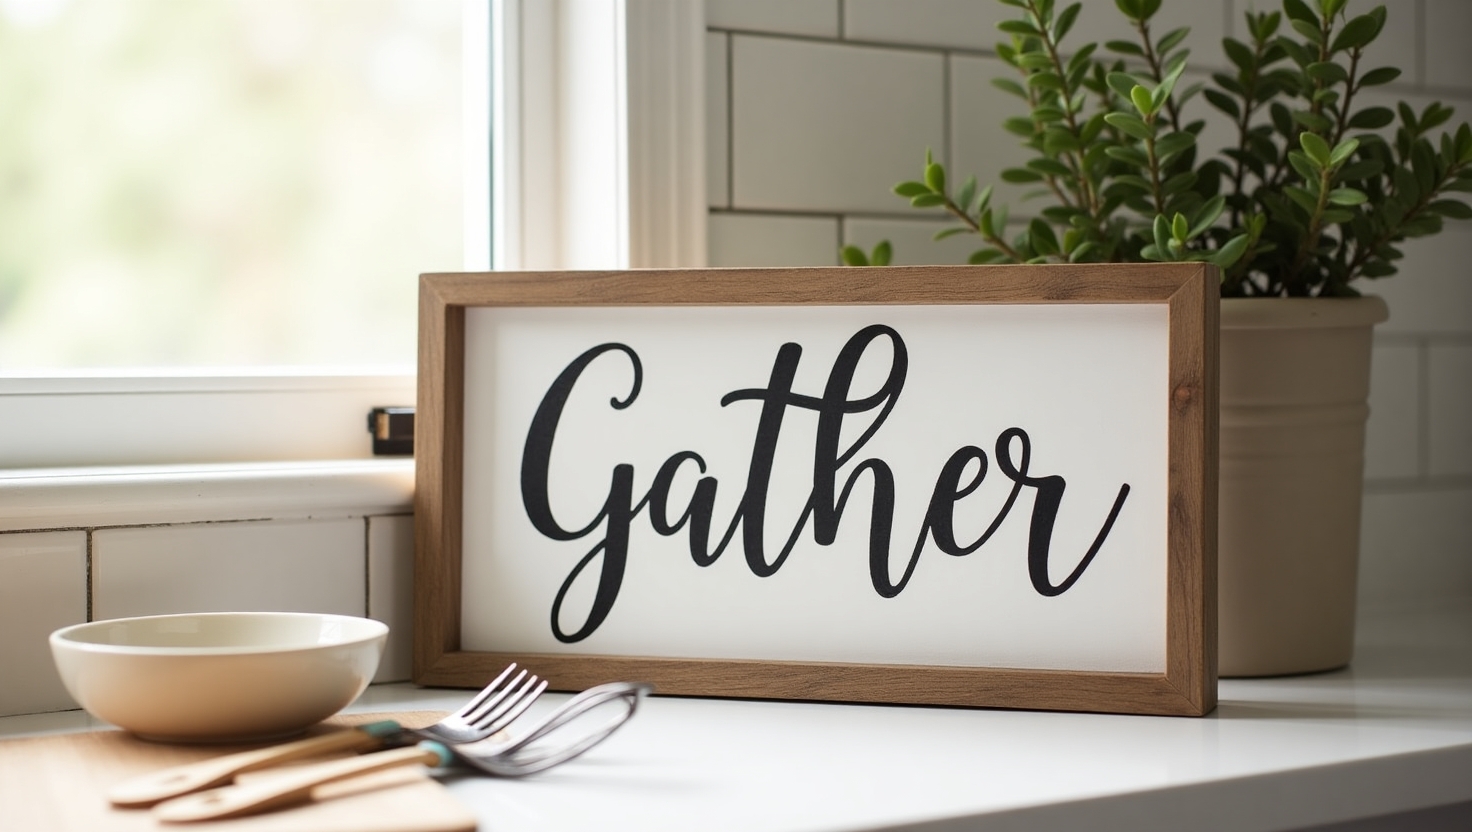
If you love the cozy appeal of Farmhouse Kitchen Signs and want to try your hand at a farmhouse kitchen signs diy project, creating a “Gather” sign is a perfect place to start. This beginner-friendly tutorial will guide you through every step, from selecting wood and adding your favorite farmhouse words to sealing and displaying your piece. By the end, you’ll have a personalized sign that embraces kitchen sign ideas and complements any diy farmhouse decoration scheme.
“This post may contain affiliate links. If you purchase through these links, I may earn a small commission at no extra cost to you. I only recommend resources I find valuable—like Ted’s Woodworking, which offers 16,000+ plans for projects like these Farmhouse Signs Diy!”
Top Questions & Pain Points
When beginners embark on a farmhouse kitchen signs diy project, they often struggle with:
- Picking the Right Wood – Deciding between pine, cedar, or reclaimed wood.
- Choosing a Style – Unsure of fonts, farmhouse kitchen signs sayings, or whether to incorporate kitchen printables.
- Painting vs. Staining – Which finish best suits your cute kitchen signs style?
- Lettering Techniques – How to create crisp kitchen signs sayings without smudging.
- Sealing and Durability – How to ensure your sign doesn’t peel or warp over time.
- Tools and Costs – Concerns about needing expensive or specialty tools.
- Time Commitments – Will it take days or can it be done in a few hours?
- Coordinating with Existing Décor – Ensuring it fits seamlessly with other diy farmhouse decoration elements.
Project Outline (5–7 Main Steps)
Here’s an overview of the process:
- Gather & Prep Materials
- Cut & Sand Your Wood
- Paint or Stain the Base
- Add Farmhouse Words & Lettering
- Seal & Style
Step-by-Step Instructions
Step 1: Gather & Prep Materials
What to Do:
- Select a wooden board (around 18–24 inches wide for kitchen sign ideas).
- Assemble your tools: saw (if needed), sandpaper, paint or stain, brushes, stencils, or vinyl cutouts.
Warnings & Preparations:
- Always wear gloves and goggles when sanding or cutting wood.
- Work in a ventilated area, especially if painting or staining.
Tips & Best Practices:
- Check for Splinters: Examine the wood thoroughly. Sand rough edges to avoid issues later.
- Plan the Layout: Sketch your lettering or design on paper first.
Tools/Resources:
- Power sander or sandpaper (80–120 grit, then 150–220 for finishing).
- Pencil and ruler for marking where farmhouse kitchen signs sayings or lettering will go.
Step 2: Cut & Sand Your Wood
What to Do:
- If the board is longer than you want, measure and cut it down.
- Sand all surfaces until they’re smooth to the touch—this helps paint or stain adhere evenly.
Warnings & Preparations:
- Keep fingers clear of the saw blade.
- Clamp your wood securely to a table or saw horses for stability.
Tips & Best Practices:
- Even Pressure: If using a power sander, move in slow, overlapping motions for a uniform surface.
- Test on Scrap: Practice sanding or cutting on a scrap piece if you’re new to these tools.
Tools/Resources:
- Miter saw or circular saw (optional if your board’s already the correct size).
- Fine-grit sandpaper (around 220) for a final pass.
Step 3: Paint or Stain the Base
What to Do:
- Apply a paint color or stain that complements your diy farmhouse decoration vibe.
- Let it dry fully before adding lettering or stencils.
Warnings & Preparations:
- Ensure proper ventilation; paint or stain fumes can be strong.
- Wear a mask if you’re sensitive to odors.
Tips & Best Practices:
- Sample First: Test your paint or stain on a small piece of wood to confirm color.
- Thin Layers: More, thinner coats usually look better than one thick coat.
Tools/Resources:
- Foam brushes or lint-free cloths for staining.
- Painter’s tape to protect areas you don’t want painted.
Finding this tutorial helpful? If you’re excited to build more Farmhouse Kitchen Signs or even larger woodworking pieces, Ted’s Woodworking provides step-by-step plans—ideal for Farmhouse Signs Diy or expanding your creative repertoire!

Step 4: Add Farmhouse Words & Lettering
What to Do:
- Use stencils, vinyl cutouts, or hand-lettering to spell “Gather,” or choose your own kitchen signs sayings.
- Incorporate farmhouse words like “Welcome,” “Blessed,” or other cute kitchen signs phrases.
Warnings & Preparations:
- If you’re stenciling, secure the stencil firmly with painter’s tape to avoid paint bleed.
- Practice lettering on paper or a scrap board first.
Tips & Best Practices:
- Lightly Pencil Guides: Outline your letters so they’re centered and level.
- Tap, Don’t Drag: If stenciling with paint, gently tap or dab the brush for crisp lines.
Tools/Resources:
- Acrylic paint pens for precise lettering.
- Cricut or Silhouette machine for custom kitchen printables or vinyl designs (optional).
Step 5: Seal & Style
What to Do:
- Apply a clear sealant (polyurethane or polycrylic) to protect the sign.
- Let the sealant dry completely before hanging or styling.
Warnings & Preparations:
- Sealants can be fume-heavy. Apply in a ventilated area, and allow your sign to off-gas outdoors if needed.
- Follow recommended drying times on the product label.
Tips & Best Practices:
- Don’t Forget the Sides: Seal all edges to prevent moisture intrusion.
- Add Décor: Accessorize with wreaths, greenery, or other kitchen sign ideas to give your space a more cohesive look.
Tools/Resources:
- Brush or foam applicator for sealant.
- Hanging hardware (e.g., sawtooth hangers) to mount your sign in the kitchen.
Ready to step up your woodworking game? Check out Ted’s Woodworking for 16,000+ project plans. Whether you’re crafting more farmhouse kitchen signs diy projects or bigger furniture, it’s the perfect next step!
Troubleshooting & Common Mistakes
- Paint Bleeding
Solution: Use painter’s tape to secure stencils; apply paint in gentle layers. - Uneven Letter Placement
Solution: Lightly mark guidelines with a pencil or laser level to ensure letters align. - Peeling or Bubbling Finish
Solution: Ensure each layer (paint, stain, sealant) dries fully before adding the next.
FAQs
- Can I use reclaimed wood for this project?
Absolutely. Reclaimed wood adds character to farmhouse kitchen signs diy projects—just sand and clean it well. - How long does it take?
With drying times, expect around 1–2 days total to finish your Farmhouse Signs Diy sign. - Do I need a fancy cutting machine for lettering?
Not necessarily. Stencils, paint pens, or hand-lettering work great, especially for cute kitchen signs. - What if I want a different phrase than ‘Gather’?
Try any kitchen signs sayings or farmhouse kitchen signs sayings you love—“Eat,” “Welcome,” or “Blessed.” - Should I seal if it’s just for indoor use?
Sealing is still recommended to protect from humidity and dust.
Next Steps & Advanced Techniques
- Distressing & Layering: Create a two-tone paint finish with light distressing for a more rustic diy farmhouse decoration look.
- Mix Fonts & Graphics: Combine script with block letters or include small floral illustrations.
- Customized Kitchen Printables: Print your favorite design on transfer paper to add detail or additional text to your sign.
Glossary of Terms
- Kitchen Printables: Ready-to-print artwork or lettering for decorating kitchen signs, labels, and more.
- Farmhouse Words: Common phrases like “Gather,” “Blessed,” “Home,” and “Eat” used in rustic decor.
- Cute Kitchen Signs: Playful or humorous sign designs often featuring puns or welcoming statements.
Recommended Visual Aids
- Step-by-Step Photos: Show each phase—sanding, painting, stenciling—to help beginners.
- Close-Up of Lettering: Demonstrate crisp edges and paint application for Farmhouse Kitchen Signs.
- Short Video Clip: Time-lapse of painting and stenciling steps, ideal for quick reference.
Conclusion
Crafting a farmhouse kitchen signs diy project—like this simple “Gather” sign—adds instant warmth to your home. From choosing the right wood and paint or stain to lettering your favorite farmhouse kitchen signs sayings, you’re now prepared to create cute kitchen signs that blend seamlessly into any diy farmhouse decoration style. Whether you experiment with kitchen printables, add your own kitchen signs sayings, or keep it classic with “Gather,” the possibilities are endless.
With these steps in mind (and maybe a little help from Ted’s Woodworking for your next project), you can bring your best kitchen sign ideas to life. So pick up your brush, let your creativity flow, and enjoy the cozy charm of your new Farmhouse Kitchen Signs!